Is a Bleeder a Reader? My Take on a Bloody Dexcom G6 Insertion

This blog post probably shouldn’t be read by anyone who gets squeamish when discussing blood or when viewing photos that show any amount of it…my apologies in advance for a bloody gross blog post, but I thought this was a good topic for discussion. 

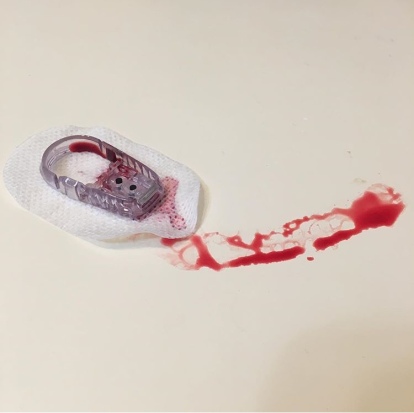
I placed the new Dexcom G6 sensor on my abdomen, hovering my index finger above the large orange insertion button. I pressed it, exhaling as I felt the minute needle pierce my skin’s surface. I looked down, and started to rub the adhesive in circles to make sure it was stuck, when I saw blood. Not just a drop, but a decent-sized pool forming beneath the sensor. Before long, just about the entire surface of the white adhesive was soaked in red.

Yeah, this was going to be a no-go.

It’s pretty rare for me to experience blood at the site of a Dexcom sensor. If I had to put a number on it, I would say less than 10% of my insertions draw blood. An even smaller amount – like, 2% – have caused me to bleed as much I did in the scenario described above. But I know I’m not alone in my bloody sensor experiences – it’s something that many other T1Ds who use a Dexcom have gone through.

There’s a bit of debate, though, that I’ve noticed in the past on Twitter threads and Instagram posts. What to do with a bleeder? Keep it and assume that it’ll read blood sugars normally? Or change it immediately and call Dexcom for a replacement?

Are bleeders readers? Or does it depend?
1B278EF4-8498-4968-81F9-9134870F3C1E
Do you think that bleeders are readers?

I’m going to go with…it depends.

Obviously, in that situation I described in the opening of this post, I decided that it wasn’t a good idea to keep the sensor on my body. There was too much blood and I didn’t trust that it would adhere well to my body. I didn’t know how long it would take for the blood to stop (only a few minutes, but still), and I couldn’t be sure that it wouldn’t mess up my readings. On top of that, I wasn’t trying to stain my clothing, if I could help it.

So in that circumstance, I did change my sensor right away, and was glad that the second try resulted in a much cleaner, blood-free insertion. I called Dexcom, explained what happened to the customer support representative, and got a replacement sensor mailed to me.

However, just about any other time I bleed upon a sensor insertion, it tends to be a minuscule amount of blood. I usually don’t even notice until it’s time to replace the sensor, and there’s a bit of dried blood left on the site. Other times, I’ll see small beads of blood forming underneath the spot where the transmitter snaps in. And there’s been a couple of occasions that I’ve bled a fair amount and been totally unaware of it until I caught my reflection in the mirror and noticed the blood staining the white adhesive. And in all of those cases, I’ve kept the sensor on for the full ten days, without noticing any discrepancies in my readings.

All that considered, in my inexpert opinion, I think that bleeders usually are readers and that they’re safe to continue wearing. Of course, there will be exceptions, like when there’s just too much blood to salvage the sensor. But every time I’ve kept using a bloody sensor, I’ve had the same amount of success with its functionality…so yes, I think that for me, bleeders are indeed readers.

 

Favorite Things Friday: My Very-Precise Pod Change Procedure

One Friday per month, I’ll write about my favorite things that make life with diabetes a little easier for me.

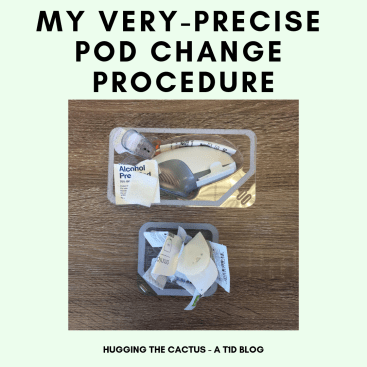
Not too long ago, it occurred to me that I am very, very, very, very, very strict about following a specific protocol every three days when I change my pod. In fact, it rarely deviates, but when it does (due to circumstances beyond my control), it throws me off track, like, a lot…which is why the way I do it is my favorite way.

my pod change procedure
Detritus from a typical set of site changes.

What’s so precise about my pod change procedure? Let me walk you through it…

Step 1) The numero uno thing I do, a half hour before I start my procedure for real, is remove a vial of insulin from the refrigerator. I’ve always been told that it’s important to let the insulin reach room temperature for at least 30 minutes before I start the pod change process. My mother was the one who told me that this step is crucial, because years ago, she’d heard from a representative at Insulet that room temperature insulin works best with pods for whatever reason.

Step 2) Once my insulin has reached room temperature, I set myself up at the island in the kitchen to go through the rest of the process. I make sure I have a totally clear area and ample lighting before I start on step #2.

Step 3) Next, I take an alcohol swab and wipe the top of the insulin vial that I’m drawing insulin from, and then I wipe my new site.

Step 4) Before even touching my PDM, I grab my syringe, stick it into the vial, and suck up the amount of insulin I’ll need for the next three days. This is usually somewhere between 100 and 150 units.

Step 5) This is where I deactivate my old pod, and jab at the buttons on my PDM to start the new pod activation process. The only reason why I get insulin into the syringe first is to minimize the amount of time I spend without a pod on my body. You might be surprised to learn that a short period of time without insulin can make a difference on blood sugar levels, but that’s just the way it is.

Step 6) I fill the new pod with insulin and hit a button to get it to start priming. During the priming period, I use an adhesive wipe around the new pod’s site to help it stick better to my skin.

Step 7) I finish up the process of removing the pod’s needle cap, then the adhesive stickers. I apply it with care to the new site and put pressure on it as I wait for the cannula to inject itself under my skin’s surface. And then I’m good to go!

Of course, I can’t always follow these steps as I’ve outlined them above. And while it messes me up a bit, and I usually have to take a little longer to change it, I roll with the punches and get it done. For instance, when I last visited Disney World, I had to change my pod in one of the park’s dimly-lit family restrooms with my mom using her outstretched hands as my mini work surface…far from ideal, but it was what it was.

Like all things associated with diabetes, I guess that I take comfort in keeping a routine, even with something as minor as a pod change.

Spare a Rose this Valentine’s Day

So Valentine’s Day is tomorrow. Perhaps you loathe the holiday of love and celebrate it solo, or choose to use the day to express your gratitude for your close friends, in the style of Parks and Recreation’s invented holiday, Galentine’s Day.

If you’re in a relationship, you might have an extravagant, candle-lit, five-course dinner planned with your loved one. Or maybe you’ll keep it a bit more simple and say “I love you” to your sweetheart, with a thoughtful card, box of chocolates, and a dozen roses in hand.

Whether or not your scenario includes a dozen roses, though, consider this:

What if you received 11 roses in your bouquet, instead of 12? What if you knew that a rose was spared because the value of that flower helped support a child living with diabetes in a less-resourced country?

I bet you wouldn’t mind getting one less rose in that case.

SquareTag

This Valentine’s Day, please consider sparing a rose as part of your celebrations. Life for a Child is a nonprofit charity that created the Spare a Rose campaign. They’re able to support nearly 20,000 young people living with diabetes by using donations to buy them insulin, syringes, clinical care, diabetes education, and more. Anyone who’s familiar with diabetes realizes that access to care, education, and resources is critical to living a healthy and normal life. No one would want to deny another, especially a child, from having to forgo these resources because of the financial burden associated with them.

Spare a rose and save child this Valentine’s Day.

A Pod Failure Won’t Foil my Fun

I had just zipped up my coat when I heard a faint, high-pitched beeeeeeeeeeep emerging from somewhere in the vicinity.

My mom and I exchanged looks. “Uh, oh,” we said simultaneously.

“It isn’t me,” Mom said, patting her pod.

“It can’t be me, it sounds too far. Are you sure it’s not the refrigerator door that was left open?” I asked, as I unzipped and peeled off my coat.

She didn’t have to answer the question, though, because as I took my coat off, the beeping sound grew louder. I looked down at my abdomen and cursed. Yup, my pod had just failed.

I wasn’t totally surprised that it happened. The dry winter air was triggering excessive static electricity that weekend, and the sweater I chose to wear that day seemed to be charged with it. I couldn’t move my arms without hearing little sparks going off. If I was smart, I would’ve changed my top to one that was less filled with static. But I had somehow managed to convince myself that there was no way my pod could possibly fail due to my clothing choices.

I know better than that.

The real kicker in this situation is that we were obviously headed out somewhere – we were hoping to go to our favorite bar for a quick drink. But with the pod’s failure occurring at basically the most inopportune time, we were left with a three choices:

  1. Stay home. Take out the insulin, wait a half hour, and resign ourselves to the fact that it just wasn’t a good night to go out.
  2. Go out, but take a syringe and a vial of insulin with us. That way, I could give myself a shot, if need be, while we were at the bar. We could head home after the one drink and I could change the pod once we were back.
  3. Go out and take a total risk by leaving all extra diabetes supplies at home, and just wait until after we had our drink to change the pod.
a63d7919-5495-497c-a8f0-30f16dcf421e
A cocktail by the candlelight.

I like living on the edge sometimes, but option #3 is just way too dangerous. So we went with option #2. If you’re wondering why we didn’t just opt to wait a half hour (insulin needs 30 minutes to come to room temperature before it can be put into a new pod), it’s merely because we didn’t want to stay out late. And yes, a half hour can make that much of a difference to me and my mom!

So we left the house with an emergency insulin vial and syringe in tow. And it’s amazing how much better it made me feel to know that I had both, just in case.

Fortunately, I didn’t need them. I monitored my blood sugar carefully during our hour-long excursion, drank plenty of water, and deliberately chose a lower-carb, whiskey-based cocktail that wouldn’t spike me. And I was able to enjoy every last sip of it before returning home and changing my pod soon after walking through the front door.

I do have to say, though, that under different circumstances, I’d absolutely make different choices. If we weren’t less than three miles away from the house, and if we’d planned on staying out for more than a single drink, then you bet your bottom dollar that I would’ve changed my pod before going out. But in this situation, I made the decision that felt right for me, and felt comforted by the fact that I had backup supplies in case I needed them.


5 Tips for T1Ds Dining Out

Nothing beats home-cooked meals. But it is nice to go out to eat after a long workweek or to celebrate a special occasion. It’s a good way to unwind and socialize.

And like many other things, it’s also a little bit more complicated when you have type 1 diabetes. Not every T1D might feel the same way as I do, but there are times when I feel worried about going out to eat. Specifically, I start asking myself questions like, “Will there be a decent variety of lower-carb choices on the menu? Have I had this kind of cuisine before, and can I accurately predict how it will impact my blood sugar? Can I order what I actually want to eat without worrying about the carb content? Will the portion sizes be too small or too big? How long will it take for my meal to arrive, and does this mean I can safely pre-bolus for it?” Sadly, those are just a few of the questions that come to mind before some restaurant excursions.

5 tips for t1ds dining out

That’s why I like to remind myself of the following five tips. They’re pretty common sense, but then again, they’re also key for me to enjoy a meal out guilt-free and in a way that works best for my diabetes.

  1. Cut down on carbs, as needed. I’ve learned that one of the best ways to make sure my blood sugars cooperate during a dinner out is to try to reduce my carb intake as much as possible. After all, most restaurants don’t have nutritional information readily available for diners to consult. As a result, it’s impossible to know every single ingredient that could be in a given dish, let alone their carbohydrate content. So that’s why I cut corners where I can. If I’m craving a burger, I order it and ask for it without a bun. I substitute fries or other starchy sides for a salad or seasonal vegetables. If I notice that a pizzeria can make a cauliflower crust instead of a normal one, then I ask for it. I find that using this strategy helps me in just about any kind of restaurant. And if I find myself wanting to order something really high carb (which is rare), then I rely on tip #2.
  2. Ask for a doggy bag. Say I ordered pasta at a restaurant. At most places, there could be upwards of 80 or 90 carbs in that one dish, which is just too much for me to consume in one meal. So I make a plan to eat half of it and bring home the rest. It’s a tried-and-true technique that works for anyone who’s trying to watch what they eat, not just people with diabetes. It’s a win-win because I can still order that carb-y dish, but I don’t have to worry about potentially taking too much or too little insulin to cover it. Fewer carbs in one sitting means less room for error.
  3. Load up on veggies. I incorporate as many vegetables as I can into my meals at restaurants. In addition to subbing sides, I also will focus on eating those if they come with an appetizer. For me, it’s all about filling up on the healthy stuff so I don’t leave the restaurant with too much food guilt.
  4. Share with your table mates. Whether I’m with a large group or just part of a pair, I almost always offer to share appetizers or desserts as a subtle form of portion control for myself. Who doesn’t love splitting an order of nachos or a slice of cheesecake? It’s a great way to start off or end a meal out that involves minimal guilt or blood sugar concerns.
  5. Order drinks with care. I’m very careful when it comes to choosing drinks that have zero carbs, or at least very few carbs. More often than not, I stick with water or unsweetened iced tea with lemon to accompany my meals. But when I choose to drink alcohol at a restaurant, I try to order a glass of wine or lower carb cocktails. I tend to have better luck with those, because I can more accurately predict how they’ll affect my blood sugar, if at all. I do like beer and order it from time to time, but I limit myself to no more than two – any more than that and I push my luck by running the risk of experiencing high blood sugars.

But arguably my most important, unofficial sixth rule is to remember to enjoy myself. There’s no sense in stressing too much about what my blood sugar might or might not do (unless there’s extenuating circumstances, then I totally pay it proper attention). I like to bear in mind that no matter how my blood sugars may react to certain foods, I still have to eat. Why not appreciate every aspect of the experience?

Memory Monday: The First Time I Self-Injected Insulin!

One Monday per month, I’ll take a trip down memory lane and reflect on how much my diabetes thoughts, feelings, and experiences have unfolded over the years. Today, I remember…

…the first time I self-injected insulin and how absolutely terrified the mere thought of doing so made me.

Since I’ve never really minded needles that much, you’d think that self-injecting would be a cinch for me. That couldn’t be further from the truth, at least for the first few times that I had to do it.

It goes back to one endocrinologist appointment when I was nine, maybe ten years old. My doctor and my parents were talking about how I was reaching an age where I should start to take on a little bit more responsibility in terms of my diabetes care. I don’t remember whether my endo or my parents suggested it, but one of the two parties said that a good starting place would be to start giving myself my own insulin.

Initially, I protested. I hated the idea. But I warmed up to it when my parents reassured me that they would check the syringe for me before I stuck it into my skin. At this point in time, I’d practiced drawing up my own insulin dosages. I’d pass the syringe along to my mother or father for the actual injection. So I had the first step in the process down pat, and it only made sense for me to put two and two together and do it all independently.

Since I was hemming and hawing over the prospect, though, my endo had the brilliant idea to practice on my father with a saline injection right then and there, given that he was willing for me to do it. As he rolled up his sleeve, I grinned wickedly (I was annoyed with him for some trivial reason that day) and waited while my doctor prepared the saline injection. As she brought it over, I panicked a little, and I must’ve asked two or three times whether it was actually safe for me to do this. Because even if I was irritated with him, for whatever stupid thing it was, I didn’t actually want to hurt him.

beechtownflorals

Once I was adequately assured that the injection would be harmless, I took the syringe into my hand, took a deep breath, and stuck it into my dad’s arm. I remember pushing down on the plunger slowly, and my dad sitting in the chair, totally composed and un-bothered by the sensation. When I took the needle out of his arm, I exhaled loudly, not realizing that I had been holding my breath the whole time. What can I say, it was a nerve-wracking feeling. It’s not every day that you learn how to inject yourself, or someone else for that matter, with a syringe.

Over the course of the next week or two, I practiced my new skill on oranges supplied to me courtesy of my parents. With each practice injection, my confidence grew and I realized that it wasn’t that scary. I would press the orange against my leg or my arm, pinch at its peel, and give it an injection of salt water – super quick, super easy.

In no time at all, I felt brave enough to give myself my first self-injection. Just like I did with my dad in the doctor’s office, I breathed deeply before plunging it into my leg, exhaling only when I was done. And I felt the satisfaction of having done it on my own, which was sweeter than I thought it would be.

Working up the courage to self-inject is just one example of many experiences I’ve had with diabetes and being afraid to try something new. Whether it was trying a CGM for the first time or transitioning to a pump, each new thing I introduced to my diabetes care and management routine scared the hell out of me at first. But just like I proved to myself that self-injecting was nothing to be afraid of, I’ve shown myself time and time again that new things for diabetes aren’t always so bad.

Hypo and Tongue-Tied: My Woes at Work

“Okay,” I thought to myself as I sat down for my 90 minute meeting, “My blood sugar’s sitting pretty around 100 or so. I should be able to make it the whole meeting without experiencing a drop, since the last time I gave myself insulin was about three hours ago…”

The fact that I had the audacity to think that my body/blood sugar wouldn’t play any tricks on me is laughable.

b952253f-ce31-4d76-b5c6-dd6c95dd80ad

This was my recent struggle at work. Usually, diabetes doesn’t interfere with my work whatsoever. I’m sitting, somewhat stationary, at a desk for eight hours every Monday through Friday. There was an adjustment period to the sedentary life when I first started working at my job, but it’s been more than four years now, so my body and my blood sugars are used to it. Plus, throughout the workday, I go out of my way to fit in extra steps, whether it’s using a restroom on a different floor or parking my car far away from my building’s entrance. Combined with my higher activity levels before/after work and regular workweek eating habits, I’d say that I’ve struck a balance in terms of physicality and diet that makes for an optimal environment for my diabetes to function normally/predictably.

So when I DO experience a high or low when I’m at work, it throws me off…but only for a relatively short amount of time. I’m talking like 15 minutes or so here. That’s right about the amount of time I need to come up from a low. If it’s a high blood sugar, I need even less time to rebound. I simply bolus, drink plenty of water, and move on to my next task. (Only in cases of 300+ blood sugars do I get really nervous – it’s only happened a couple of times, but I’ve had to leave work when that happens either due to feeling sick or needing to go home to deal with it.)

But things were different the other day when I was in the middle of a meeting with a colleague and I could feel the slow and steady drop of my blood sugar. Despite having monitored it closely prior to the start of the meeting, it started to coast down. Here’s the real kicker, though – I’m pretty in-tune with my body and could feel that this was not an urgent low. I figured my blood sugar was somewhere between 65 and 75. I didn’t have my CGM or meter to confirm, and I felt like I could keep the meeting going…so I didn’t do anything about it.

And in hindsight – even if it is 20/20 – I wish I had done something.

Why? Mainly because I felt that I was virtually useless in my meeting. As I reviewed each page of the 80+ slide PowerPoint, I could feel my thinking start to deteriorate. Words were tumbling out too quickly and nonsensically. I wasn’t sure if I was making a whole lot of sense to my colleague. And that’s a feeling that I can’t stand. I don’t like thinking that I may have wasted her time due to my determination to “power through” a low. It’s a perfect example of low blood sugar causing a symptom other than shakiness, sweating, or sluggishness: In this case, it also caused stubbornness.

When I finally made it back to my cubicle, I slumped down into my chair and grabbed a juice box from my low supply stash while my CGM buzzed over and over, letting me know that I was indeed low. Within approximately 8 seconds, the juice box was crushed, and I couldn’t help but think how next time I had a meeting, I’d bring one with me…just in case.

Third Time’s the Charm: Here’s How I Restarted My Dexcom G6

You GUYS! I finally did it! I managed to restart my Dexcom G6. Sometimes, a little bit of trial and error pays off.

I restarted it by following the exact same steps that I linked to in my post from a few weeks ago. It involved five simple things:

  1. Allowing my sensor to expire and remain on my body
  2. Starting a new sensor session and choosing “no code” when prompted
  3. Running the 2-hour warm-up session for only 15 minutes, then stopping it
  4. Starting a new sensor session again, without a code (if you still have the code, though, that you used when you first inserted the sensor, then enter that into your receiver/app. But don’t make up a code or enter one from another sensor – just say “no code” if you don’t have it)
  5. Allowing the 2-hour warm-up session to take place and receiving readings once it’s complete

The only thing that was different between this time and last time was the steps leading up to the restart. What do I mean by that? Well, for starters, I made sure I was attempting to restart a sensor that was giving steady, reliable readings – it seems as though it’s impossible to restart a sensor if it’s experienced any sort of error in the 10 days it’s been worn. So this means that when the sensor expired, I’d been receiving readings consistently up until the moment it expired.

afd124d9-95d7-48be-b5dd-7445fc6efdd2
That gap represents the sensor’s second round of two-hour warm-up.

That was the main difference. The location of the sensor I restarted was the back of my arm, which may or may not have affected the restart. I also restarted without using the sensor code, which I had set aside to use but somehow misplaced prior to the attempt. I have no idea if having or not having the code makes the restart more or less successful, but I do know for sure that I got three more full days of use out of my sensor. Cumulatively, that means that I was able to wear the same sensor for almost two full weeks! It might not seem like a lot to the marathoners who are able to make older G5 sensors last 3-4 weeks (I’ve even heard of people keeping the same one on and working for 6 weeks), but it’s exciting to me to have confirmation that it IS at least possible to restart a G6 sensor.

In terms of the sensor accuracy, dare I say that it was even MORE accurate on the second go?! I don’t have proof to really back that up, but honestly, it seemed that it was right on point with all my blood sugar readings (within 5-10 mg/dL). I don’t know how to explain that, but no complaints about it here.

The only other difference that was noticeable during the sensor extension was that I was prompted to calibrate at least every 12 hours. No big deal, since I had to do that when I was on the G5. But it caught me off-guard a bit at first, because on both my receiver and within the Dexcom app, a small blood drop icon was always visible onscreen (when actively checking the app or the receiver). Initally, it wasn’t too alarming because it was merely a reminder to calibrate twice daily. But then it became an absolute nuisance when weird “calibrate after __ A.M./P.M.” messages occurred multiple times per day. I would check my blood sugar at the appropriate time and enter the result into my app/receiver, only for it to be rejected and trigger another specific time-calibration message.

To me, that indicated that my sensor’s second go-around ought to come to anend sooner rather than later. It was getting obnoxious to have to wait and check my blood sugar manually in order to appease the Dexcom messages that kept popping up. Plus, it came down to my comfort levels with wearing a sensor for a certain length of time – I just don’t love the idea of keeping the same one on for ages.

But this was my first taste of success with restarting a sensor, so naturally, I want more of the same! I’ll definitely continue to try to extend the life of future sensors, but remember, follow the steps above at your own risk. When in doubt, simply follow protocols as outlined by Dexcom. If I experience an even more successful sensor extension, you can bet that I’ll have all the details to share with you all here.


Aim for an A1c of…What?!

All my life, I’ve been told that I should do what I can to keep my A1c levels between 6 and 6.5. This is the “ideal” range, the sort of long-term goal I should bear in mind on a daily basis.

So when my primary care doctor suggested that an A1c of 7 to 8 might be a more realistic, sustainable, and healthy zone, my jaw dropped to the floor.

He explained his reasoning for saying such a thing: Since people with diabetes obviously have different needs when compared to people without diabetes, it’s not entirely logical to expect a person with diabetes to maintain an A1c that they might have with a functioning pancreas. He said that as time goes on, it could affect cognitive abilities.

And then he said that this was the range that would be recommended to a person with type 2 diabetes – there’s no new research that indicates any difference in desirable A1c levels for a person with type 1 diabetes, so, as my doctor said, I should continue to aim for 6 to 6.5.

This was such a WTF moment for me, for a couple of reasons.

eb0ed848-712c-4a3f-9ed2-646696324953
Does anyone else feel super awkward taking selfies in exam rooms? Does anyone else even take selfies in exam rooms?!

One being that I had NO IDEA why he was saying this to me. He built up this whole explanation as to what the “new recommended A1c” is, only to inform me at the very end that it was only safely applicable to people with T2D at this time. Was he confused? Did he forget that I have type one for a minute there?

The other reason I was flabbergasted by this little discussion was that we hardly ever go into detail when it comes into my diabetes. In fact, he didn’t even ask me when my last A1c test was, or any questions regarding my insulin pump/CGM. He just asked the standard “how is your diabetes” question, to which I replied with a super-lengthy, not-at-all vague response: “good”. He did put orders in for the standard array of tests that I take for each annual physical, which would inform him of my blood sugar at that moment in time, as well as my current A1c. But it was nothing that I’d be talking to him about during that appointment because the results wouldn’t be available until late in the day. So yeah, I found the whole thing to be pretty bizarre and mildly misleading.

Coincidentally, I’ll be seeing my endocrinologist in a few weeks, and let’s be real here: She’s the one doctor who can best advise me when it comes to diabetes treatments and protocols. So I’ll be sticking with her recommended A1c range for me, which I have a feeling won’t be any different from what I’ve been told all these years with diabetes.

My New Low Blood Sugar Symptom

In the last 21 years of diabetes, my low symptoms have been pretty predictable and easily recognizable: shakiness, sweating, dizziness, and sluggishness are all signs that I need some sugar, stat.

But lately, I’ve started to experience one brand-new and totally weird low blood sugar symptom. I’ve decided to dub it “fuzzy tongue”.

Love always wins..png
“Fuzzy tongue” or “terrycloth towel tongue” is now one of my low blood sugar symptoms.

I don’t know how else to describe it other than that it feels like my tongue and lips are covered in a terrycloth towel as my blood sugar starts to fall to a certain level, usually 75 mg/dL or lower. Simultaneously, it’s a numb and tingly sensation that feels so disorienting and makes the process of chewing glucose tablets or drinking juice a little more difficult, because it feels weird to eat or drink when my entire mouth feels like it’s covered in cloth.

In fact, the first time it happened, I took to Twitter to ask the rest of the DOC if there was anyone else who had experienced something like that before. And I was comforted by the many responses I got back that assured me that I wasn’t alone in feeling this strange symptom:

“Yes, from certain lows. Sometimes I feel like my [whole] body is buzzing and fuzzy, if not fizzy. Other times, it’s like my body says, “BTDT! Got the glucose tabs! Move on!”

“YES! This is a new symptom for me too (after 17 years of treating lows)..Thought I was allergic to honey the first time.”

“This is a common one for me. Tongue and lips. I hate it”

“Sometimes I get tingly lips or tingly fingers!”

“That’s almost exclusively how I can tell that I’m low”

“YES! If it’s a prolonged low, I get tingly lips and tongue. It’s super weird and really uncomfortable.”

“I get more of the tingling/partial numbness in the lips (‘fuzziness,’ I suppose) that some have described. Usually this occurs with a bad low (under 50 mg/dL).”

Those are just a few of the replies that my initial tweet received. I found these particularly interesting, though, because one person identified it as a new symptom, too, and others implied that it’s always been an indicator of low blood sugar that’s more likely to occur with “bad” lows. In addition to helping me feel a bit more normal about the discovery of my new low symptom, I also found this to be an example of the ways in which the DOC is uniquely unified. To an outsider, this whole Twitter thread probably makes zero sense and comes across as bizarre. But to someone part of the DOC, it’s just another conversation that brings T1Ds trying to get to the bottom of a ‘betes mystery together.

So even though “fuzzy tongue” is uncomfortable, I’m glad to know I’m not the only T1D who’s felt it…and I’m very glad that my body has found another way to alert me to a low blood sugar, especially since it’s a way that makes me want to correct it more quickly than ever before.