I’ve had four CGM sensors fall off in the last six weeks or so.
Four! And they’ve all been in different locations, too – both the left and the right sides of my thighs and my stomach. I’ve worn overlay patches – at times multiple – to help keep them on, and I’ve still dealt with adhesive that just doesn’t want to lay flat against my skin.
What gives? I can’t recall a time in which I’ve had worse luck with my CGM sensors staying stuck.
I’ve gone through quite a few overlay patches in the last few weeks in an attempt to get my CGM sensors to stay stuck on my skin…with mixed success.
Normally, I’d blame it on weather, but it hasn’t exactly been warm here in New England yet. Temps have mainly stayed in the 50s and 60s, so it’s not like I can pinpoint the problem on heat.
The only silver lining in this scenario is that Dexcom does have a nice replacement program. They make it really easy to submit a patient support request online that goes straight to Dexcom support for processing. Filling this form out takes me no more than five minutes and by doing so, I’ve received a replacement sensor for each one that’s fallen off in the last month and a half. And while I was starting to worry that I was submitting too many requests, Dexcom hasn’t further inquired me on the matter yet, so I feel a little better knowing that I can count on them to give me replacements for sensors that won’t stay stuck.
Until the adhesive improves, though, it looks like I’m stuck wearing at least two or more overlay patches on my sensors to ensure their 10-day lifespans.
I guess they just don’t make ’em like they used to…
This post was originally published on Hugging the Cactus on September 27, 2019. I’m sharing it again today because I still find the concept of “sensor soaking” to be fascinating, though I haven’t been brave enough to try it yet. Not sure what sensor soaking is? Read on to find out…
I saw an Instagram story a few weeks back that intrigued me.
In it, a friend of mine was talking about how she “soaks” her CGM sensors. Instantly, I was confused: What the heck did she mean by that? Soaks them in what, hot water or some other liquid?
Contrary to the connotation of the word “soaking”, this does not mean you’ll be submerging your CGM in any sort of liquid.
Within seconds, her definition of “soaking” became much clearer. “Soaking” a CGM sensor means inserting a fresh sensor hours before you intend to activate it. Rather than giving your sensor just two hours to warm-up, you’re giving it 4-6 hours so it can supposedly provide much more accurate readings immediately after the warm-up period has ended.
I was interested in this practice because I’ve definitely experienced sensors that were off for several hours post-insertion/warm-up. Sometimes, it even takes a full day for a sensor to start reporting accurate numbers, and I wouldn’t exactly call that efficient.
While I haven’t had the guts to actually try sensor soaking yet – I’d like to sometime in the near future – I’ve been doing some research on it so I’m fully prepared to try it whenever I’d like. Here are some questions I had about the process, and the answers I’ve found to them:
Q: Doesn’t this mean that you’re wearing two sensors at once? A: Yes. But it’s only for a short window of time, until the old sensor expires and it’s time to activate the new one; in other words, for the full soaking period.
Q: How long should I let a new sensor soak? A: According to what I’ve found online, it seems that 4 to 6 hours is the sweet spot for soaking. It’s basically doubling or tripling the built-in warm-up period that all sensors must go through, so I can see how this might contribute to improving immediate accuracy.
Q: How do I protect the new sensor if it doesn’t have a transmitter snapped in it for several hours? A: The reason why I haven’t tried soaking yet is because I was worried about wearing a sensor that didn’t have a transmitter snapped in it. But I found some photos online of people who wore transmitter-less sensors with stretchy, self-adhesive wrap tape to protect the nook in which transmitters rest for the soaking period. It’s smart to protect that space, because in theory, it could be vulnerable to catching on clothing or other surfaces. Plus, tape like that is really easy to remove without damaging the sensor in the process.
Q: What changes about the sensor activation process when it’s finally time to start the new soaked sensor? A: My research leads me to believe that nothing really changes at the end of the soaking period/when it’s time to activate the soaked sensor. All that will be needed is the sensor code so it can be properly activated within the receiver/Dexcom app. So the most important thing you can do at the very start of the soaking period is hold onto your sensor code/store it somewhere safe so you’ll be able to enter it at the end.
Q: So…why would anyone bother trying this again? A: My understanding is that it all relates back to making sure a fresh sensor is as accurate as possible once it’s activated. I can’t tell you how many times I’ve put on a new sensor, only to discover a few hours after it has warmed up that it’s off by 40 or 50 points – and that just doesn’t cut it. So I don’t think there’s any harm in me giving sensor soaking a shot one of these days. I just have to remember to do it, and have the patience to wear three devices at once (my pod, the soon-to-expire sensor, and the new soaking sensor).
Have you tried soaking? If so, please drop a comment and let me know your thoughts on it – and be sure to tell me if I missed any key steps in my research!
I don’t usually regret trying new sites for my Dexcom and OmniPod.
But recently, I discovered the one area that I wish I hadn’t tried…and that is my forearm.
For a couple years now, I’ve seen forearm Dexcom sites all across social media. People lauded the location for how comfortable it is and the accurate readings it produces, so I figured, why not give it a shot? (LOL diabetes humor.)
Plus, I wanted to give my stomach and the backs of my arms a break. I put both pods and sensors in those locations and while I like them a lot, I’m wary of scar tissue building up.
So with little fanfare, I tried putting my Dexcom on my left forearm (my non-dominant arm). And I knew immediately after hitting the orange button to insert the sensor that it was a bad choice because it STUNG. It stung something fierce! I remember wincing the moment it pierced my skin, and fortunately, the pain did go away…but resurged with a vengeance about half the time I made any arm motions. It didn’t matter if I was flexing it up or down or twisting it to reach for something – any movement could trigger varying degrees of pain. Nothing incredibly intolerable, but enough to make this site uncomfortable.
My face says exactly how I feel about this site: It’s not a winner.
And this pain didn’t altogether disappear one day: I still felt stings 24 hours after I put the sensor on. Maybe I hit precisely the wrong spot (I noticed a very small amount of blood discoloring the white adhesive of the sensor), but I asked the diabetes online community and it seems that the general consensus is that this location sucks. The half-dozen or so people who messaged me said that either the pain was too much and they took the sensor off early, or they toughed it out for a full 10 days and never used the site again.
What’s more is that this site wasn’t as out-of-the-way as I wanted it to be. I roll up my sleeves dozens of times each day for different tasks, and each time I went to roll up my left sleeve, I had to go about it gingerly so I didn’t risk bumping into the site and prompting ripples of pain. This was straight-up annoying because my diabetes devices don’t usually inhibit my movements so much.
The one plus-side of trying the new site, and the only thing that motivated me to keep it on for the full 10 days, is that it was just as accurate as any other Dexcom site I’ve tried. My readings matched up pretty closely with how I felt and with what my blood sugar meter reported, so that was a saving grace. And I have to admit that even though I was worried that sleep would be impossible with the sensor in such a tender spot, it really didn’t interfere with my slumbers, which was a relief.
All in all, though, the accuracy wasn’t enough to convince me to want to keep forearm sites in my regular rotation. I’ll stick with abdomen and upper arm sites for now, with the occasional thigh site to further prevent scar tissue.
Something that all people with diabetes that I know – myself included – struggle with from time to time is the adhesive that keeps our diabetes devices stuck to our bodies.
Real talk? Both the adhesives for my pods and my Dexcom sensors can be lackluster. About half the time, the adhesives that secure them to my body begin to peel around the edges when I’m only partway through the wear time of both devices. And another (much smaller, though far more infuriating) part of the time, the adhesives lose their stickiness entirely, causing the device to fall off my body.
When the adhesive is the reason why a sensor or a pod doesn’t last the full 10 and 7 days, respectively, it’s practically like experiencing a slap in the face because at least a technology error or failure feels more out of my control…the adhesive, though, feels like something that should never be a real issue, and I can’t help but blame myself for not making a pod or sensor more secure when the glue completely fades.
On the bright side, my experience with less-than-sticky pods and sensors forced me to think of ways to get them to last their full lifecycles on my body. Here’s how I make them last as long as possible:
Protective barrier wipes: I use these wipes each time I do a pod change. When my new pod is priming, I wipe whichever site I’m about to place it on with a protective barrier wipe. (I use an alcohol wipe earlier on in my pod change process.) These seem to help with adhesion without adding a ton of stickiness like regular SkinTac wipes tend to do. They literally do what they say they’ll do, which is make a protective barrier for a piece of medical equipment to stick to easily.
Dry my skin: This seems incredibly obvious, but I make sure that new pod and sensor sites are as dry as possible before I apply a device. This is much more of a problem for me in the summertime when weather causes me to sweat more, but I’ve been able to navigate that by wiping my skin with a clean towel and making sure air is circulating well in the room in which I’m applying the pod or sensor so any excess moisture evaporates off my skin.
I may or may not have tried using Scotch tape in the past to get my devices to stick better…(Spoiler alert: It did not work and I do not recommend.)
Specially designed stickers: Both Dexcom and OmniPod produce stickers that customers can request for free. I get them mailed straight to me and I find that they are most useful when a pod or a sensor is hanging precariously off my body. The stickers are shaped exactly to fit around both, so I never have to worry about missing a spot, and they’ve definitely helped me save more than one pod and sensor in the past. I don’t like wearing them unless I have to, though, because sometimes the extra adhesive seems to make the underlying adhesive weaker (not sure how that’s possible, but I’ve always had more luck waiting to add a sticker on top of a loose pod/sensor that’s in its last couple days of wear than adding the sticker on top in the beginning).
The “circle and press” technique: Most people probably already do this, but I actively have to remind myself that when I apply a new pod or sensor, I need to take my finger and circle it around the adhesive firmly three times in order to make sure it’s pressing up against my skin as securely as possible. This method also sort of irons out any wrinkles that might have appeared when the pod or sensor was initially stuck on, so it’s a simple yet effective thing to do…which is absolutely something we could all use more of when it comes to handling diabetes.
I can’t be the only one who feels that it takes five-ever (which is even longer than FORever) for high blood sugar to come back down to normal levels.
I don’t use any super-fast-acting insulin (such as Afrezza or Fiasp), so typically, I have to wait about an hour for my good ole Humalog to kick in. And an hour can feel agonizingly long when it comes to diabetes.
Fortunately, I’ve used different tips and tricks over the years to help make that hour fly by:
Blast some music and dance around in place. You might feel dorky when doing this, but I honestly swear by it – not only is it fun, but it can also help my blood sugar come down faster because yes, dancing around is still exercise!
Sip water over the course of the hour. I challenge myself to drink at least one full water bottle (I’m talking my 25 ounce reusable water bottle, here) in this hour of time. It’s my opportunity to rehydrate myself, and it’s also a good way to flush out the system when trying to bring a high blood sugar back down.
Watch episodes of “comfort” television. I know that I can watch exactly one episode of The Boys, two episodes of Sex and the City, or three episodes of Community (yes my taste in TV is eclectic) and allow myself to get totally immersed in the shows as opposed to stressing about my blood sugar. I call these shows “comfort” TV because I’ve seen all the episodes before, but I enjoy them still and I know how much of them I need to watch in order to stay distracted.
Read a magazine or a few book chapters. I’m kind of a hoarder and I save old magazines that I’ve purchased at airports over the years…but my magazine stash comes in handy when I need an hour of time to go by faster because I can pretty much read one cover to cover (depending on how big it is, of course) while I wait for my blood sugar to come down. Or I can turn to my book collection, select a piece of “comfort” literature (like the comfort TV described above), and get lost in the words for awhile.
I could stare at a clock and/or my CGM when my blood sugar is high and wait *patiently* for it to come back down…or I could make time go by a lot faster by keeping myself occupied.
Get into an arts and crafts project (or anything that requires focus). For me, this is knitting. Depending on the knitting project, it can take anywhere from a day to weeks to complete something. So if I need to wait for a high to come back down, I can focus on making knitting progress as opposed to what my blood sugar’s doing for an hour – and honestly, I sometimes get so into my work that I don’t stop for a few hours. Time goes by quickly when knitting!
Make it impossible to keep checking the CGM app. Sure, I could torture myself by checking my app literally every 5 minutes for updates, but that’s one guaranteed way to drive myself crazy for a full hour (or longer, because there’s a 15-minute delay with my CGM). So I force myself not to check it by putting my phone in a different room, silencing it, or turning it off altogether. Removing the temptation to check my blood sugar is majorly helpful when waiting for it to drop down because I’m not constantly stressing over how long it’s taking for the insulin to start working.
It might seem kind of ridiculous that I rely on these strategies to make time go by faster when I have a high blood sugar, but they work – and feel a heck of a lot better to do than anxiously staring at my CGM for a full hour!
I may have had diabetes for more than three-quarters of my life, but that doesn’t mean that I don’t make silly mistakes with it from time to time.
But I must admit, I still surprise myself on the occasions that I make a slip-up that’s incredibly stupid…and incredibly avoidable.
In life with diabetes (and in general), mistakes are bound to happen…
For example, one morning my Dexcom started alarming, and I thought that I knew exactly why it was sounding off: It sounded like the signature triple buzz of a high alert, so I did what anyone else would do when it’s very early in the morning and not quite time to wake up yet…I ignored it and fell back asleep.
But true to typical Dexcom alarm nature, my sleep was interrupted again by continued buzzing. Rather than pick up my phone to dismiss the alarm, though, I decided to bolus for a couple of units without ever verifying that I was, indeed, high.
Yikes. Can you say rookie mistake?
Fortunately for me, I really did have to get up and start my day within a couple of hours of taking that bolus. Thank goodness I did, because when I got up, I immediately glanced at my Dexcom and was taken aback to see that my blood sugar had not ticked up past my high threshold in the last several hours…it had actually lost reception completely.
Ahh…so that’s what it was trying to tell me. Oops.
Furthermore, my blood sugar was inching below my low threshold – the two units I’d carelessly taken had kicked in, and all I could feel in that moment was relief that I hadn’t taken more insulin.
This story could’ve had a very different ending. I’m still kind of in disbelief that I didn’t just roll over to check my Dexcom and confirm the reason why it was alarming in the first place. I mean, that’s what I do any other time it goes off, regardless of the time of day. I suppose that I was just overly confident in what kind of alarm it was. Coupled with the fact that I was barely awake when this all went down, then it really isn’t all that crazy that this happened…but it doesn’t make me feel any less dumb.
Lesson learned. When it comes to Dexcom alarms, always check them, and never make assumptions.
I’ve decided to take a break from continuous glucose monitoring. This means that for an undefined period of time – maybe 3-4 days, a week, or a few weeks – I’m not going to wear my Dexcom G6 CGM.
Initially, I wanted to give myself a break because I was just burnt out from wearing it all the time and feeling so dependent on it. But as I started thinking about more, I realized that there were some other really great reasons for me to take a break from my CGM:
1 – I wanted to wear one less device. It can be tough to wear two medical devices 24/7. Sometimes I get super self-conscious of them. Other times they just aren’t comfortable to wear, such as when I roll over one the wrong way when I’m sleeping at night. So it’s nice to feel a little more free with one less device stuck to my body at all times.
2 – I was sick of the constant data feed. All those alarms going off whenever I cross my high or low threshold are straight up annoying!!! I know I could just turn them off on my CGM receivers, but the point of them (for me) is to try to maintain as tight of a control on my numbers as possible. But now that I’m intentionally not wearing my CGM, I’m realizing how much I appreciate the reprieve from all that buzzing and beeping.
There’s lots of reasons to take a break from continuous glucose monitoring, but sometimes one is enough.
3 – I have some new blood glucose meters to try. The only way that I can really put my new meters to the *test* (lol) is to use them – and goodness knows that I have very little desire to do manual finger stick checks when I’m wearing my CGM.
4 – I’d like to hold myself more accountable. I rely on my Dexcom heavily at all times. I look to it before I start exercising, before I eat something, before I do anything, really. I bolus using the data it provides and trust it implicitly. But I’ve recognized that by developing this habit, I’ve become lazy. I don’t measure out food as much because I figure that if I bolus too much or too little for it, I can just watch what my Dexcom tells me and treat from there. It’s kinda sloppy, in my humble opinion, so I’m trying to put more of the trust back in myself for my diabetes monitoring.
5 – I’m trying to reacquaint myself with my body’s cues. Before CGM technology, I was really good at recognizing high and low blood sugar symptoms…but then I started using a CGM and found myself reacting to highs and lows (e.g., treating them prematurely), even if I didn’t feel those high/low symptoms. So I want to retrain myself so I can make sure I never lose that ability, because I think it’s important to know exactly how my body alerts me to various blood sugars, rather than depending solely on a piece of technology to do it for me.
The summertime season is in full swing, and now that it’s here I’m thinking of the various ways my diabetes is more pronounced in the warmer weather. It’s much more visible, leading to many more questions, but what are the cues that give it away to others? I thought of four…
Visible sites. Shorts-and-t-shirts weather makes it much harder to place pods or CGM sensors in discrete locations. And if I’m going to the beach? There’s no way that I can even attempt to hide my devices. That’s probably why I make them even more obvious with…
…Pump and sensor art. I’ve written about Pump Peelz and GrifGrips in the past – they make adhesives and skins that are specially designed to fit pods, PDMs, pumps, meters, and more. The products they make are truly little works of art for diabetes devices, and I like to make sure all of mine are decked out in the summer months so I can show off tech that’s not only functional, but also stylish.
I’m looking forward to donning my best beach-y Pump Peelz on what I hope will be many trips to the beach this summer.
Gadget tan lines. Or if you’re like me, it’s more like sunburn lines. That’s because each summer, without fail, I somehow manage to neglect the space around my pod or my sensor, so when it’s time to remove it, there’s a huge red circle around the perimeter of where the device was situated. Maybe this year I’ll actually learn my lesson and take the time to apply sunscreen properly so I can avoid the very not-cute sunburn circles.
Travel coolers. This is probably the least obvious sign of diabetes in the summertime, but to those in the know, coolers meant to protect insulin are pretty recognizable compared to regular coolers. Whether it’s a Frio cooling pouch or another brand of insulin cooler, people with diabetes tend to carry these throughout the summer months in order to prevent insulin from spoiling due to heat exposure.
Life with diabetes can be the opposite of a cakewalk. In fact, it can be so frustrating at times that I seriously consider ripping my hair out due to sheer agitation.
When thinking about the things that drive me nuts about diabetes, I came up with a list of 8 occasions in which I come this CLOSE to losing my freakin’ marbles:
1. When low blood sugars refuse to come up…
2. …And when high blood sugars refuse to come back down.
I’m considering these first two as separate list items because the scariness of a lingering low and the frustrating nature of a stubborn high can be two very different types of “GAAAAAAAAHHHH!” But both can be especially suck-y when you feel and know that you’ve been doing everything right to treat them without experiencing the expected results.
3. Pod and CGM sensor failures.
Oooh, any sort of device failure can be so exasperating any time of day. But they’re worse when they happen at inconvenient times, such as in the middle of the night or during an important conference call. All diabetes technology should work flawlessly at all times, but that’s not always the reality that we live in.
4. Inaccurate results.
I can’t stand when my blood sugar meter or my CGM report false readings. Sometimes, I’ll check my blood sugar two times in a row just to see how close both readings are to one another, and it makes me want to throw my meter across the room when I see that they’re off by 20+ points. Once, I had a reading that was off by more than 50 points! That makes a major difference in how much insulin I give myself in that moment in time, so inaccurate results can really derail my blood sugars for hours after.
I’m sure you can imagine how entertaining the search results were when I looked up images to go with this blog post.
5. Folds in the adhesive.
Whenever I apply a fresh sensor or a pod, I try to be super careful and make sure that the adhesive sticks smoothly…but despite my best efforts, that doesn’t always happen. Folds in the adhesive are far from the worst thing in the world, but they do make it more difficult for my devices to stick on for the full length of time that I need to wear them, and I usually end up having to add tape around them to reinforce the hold. More tape = more folds = more irritation!!!
6. Unexplained blood sugars.
Anyone with diabetes has been there, done that. You could follow the exact same routine from one day to the next, even eating the same foods at the same times, and get totally different blood sugar results. Or maybe you thought that you bolused perfectly for a meal, only to find out hours later that you’re much higher or lower than you anticipated. Whatever the reason behind them may be, unexplained blood sugars are just obnoxious.
7. Screeching alarms.
Speaking of things that are obnoxious, let’s talk about wailing OmniPod or Dexcom alarms for a hot second. There’s nothing like a resounding BEEEEEEEEEEEEEEEEEEEP to ruin your day!
8. The INSANE costs of our supplies.
Undoubtedly, the thing that most makes me want to rip my hair out when it comes to diabetes is the cost of supplies. I’ve blogged more and more recently about the criminal cost of insulin – since the 1990s, the cost of insulin has increased over 1,200% (!!!) – and I’ll continue to do so until EVERYONE with diabetes can afford this life-saving medication. We never asked for diabetes to happen to us. But it did. And the fact that many people with diabetes have to make sacrifices in order to, well, survive, is simply not okay, and the most infuriating thing about living with this chronic illness.
This post was originally published on Hugging the Cactus on February 18, 2019. I’m re-posting it today with some updates because I recently noticed this post gets a LOT of clicks – this topic is one that many people are curious about it. Read on for my two cents on whether or not bleeders are readers, and note that I haven’t updated this because my experience with bleeders remains the same…
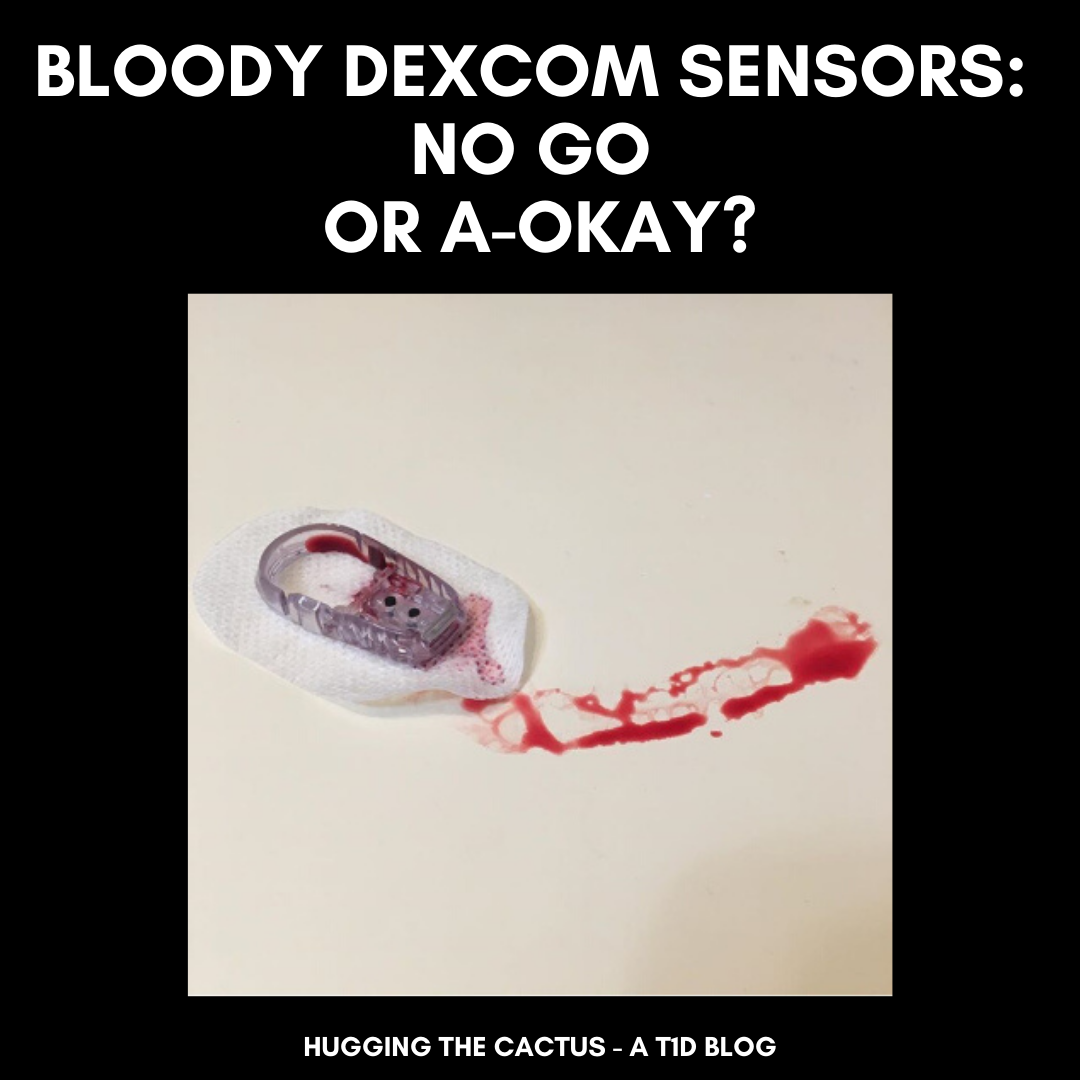
I placed the new Dexcom G6 sensor on my abdomen, hovering my index finger above the large orange insertion button. I pressed it, exhaling as I felt the minute needle pierce my skin’s surface. I looked down, and started to rub the adhesive in circles to make sure it was stuck, when I saw blood. Not just a drop, but a decent-sized pool forming beneath the sensor. Before long, just about the entire surface of the white adhesive was soaked in red.
Yeah, this was going to be a no-go.
It’s pretty rare for me to experience blood at the site of a Dexcom sensor. If I had to put a number on it, I would say less than 10% of my insertions draw blood. An even smaller amount – like, 2% – have caused me to bleed as much I did in the scenario described above. But I know I’m not alone in my bloody sensor experiences – it’s something that many other T1Ds who use a Dexcom have gone through.
There’s a bit of debate, though, that I’ve noticed in the past on Twitter threads and Instagram posts. What to do with a bleeder? Keep it and assume that it’ll read blood sugars normally? Or change it immediately and call Dexcom for a replacement?
Are bleeders readers? Or does it depend?
Do you think that bleeders are readers?
I’m going to go with…it depends.
Obviously, in that situation I described in the opening of this post, I decided that it wasn’t a good idea to keep the sensor on my body. There was too much blood and I didn’t trust that it would adhere well to my body. I didn’t know how long it would take for the blood to stop (only a few minutes, but still), and I couldn’t be sure that it wouldn’t mess up my readings. On top of that, I wasn’t trying to stain my clothing, if I could help it.
So in that circumstance, I did change my sensor right away, and was glad that the second try resulted in a much cleaner, blood-free insertion. I called Dexcom, explained what happened to the customer support representative, and got a replacement sensor mailed to me.
However, just about any other time I bleed upon a sensor insertion, it tends to be a minuscule amount of blood. I usually don’t even notice until it’s time to replace the sensor, and there’s a bit of dried blood left on the site. Other times, I’ll see small beads of blood forming underneath the spot where the transmitter snaps in. And there’s been a couple of occasions that I’ve bled a fair amount and been totally unaware of it until I caught my reflection in the mirror and noticed the blood staining the white adhesive. And in all of those cases, I’ve kept the sensor on for the full ten days, without noticing any discrepancies in my readings.
All that considered, in my inexpert opinion, I think that bleeders usually are readers and that they’re safe to continue wearing. Of course, there will be exceptions, like when there’s just too much blood to salvage the sensor. But every time I’ve kept using a bloody sensor, I’ve had the same amount of success with its functionality…so yes, I think that for me, bleeders are indeed readers.